Vue3 Vue3 与 Vue2 的区别
1. 全局属性
1) Vue2
- 对于一些第三方插件,Vue2 中通常使用 prototype 原型来挂载到 Vue 对象中
import Vue from 'Vue'
Vue.prototype.$http=Axiox
Vue.prototype.$echart= Echart
2) Vue3
- Vue3 中提供了一个名为 globalProperties 的全局属性配置,可以代替 Vue2 中的 prototype
app.config.globalProperties.$http = Axios
app.config.globalProperties.$echart = Echart
- 使用$http
import {getCurrentInstance} from 'Vue'
setup () {
    const { ctx } = getCurrentInstance();
        onMounted(() => {
            console.log(ctx.$http)
        })
    .......
}
2. ref与v-for的生成
1) Vue2
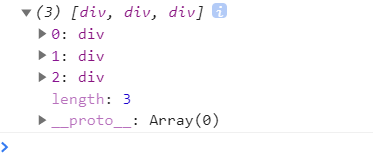
Vue2中v-for与ref一起使用,批量模板引用的时候,获取的ref为一个数组
<div v-for="i in 3" ref="setItemRef" :key="i">{{i}}</div> //这里是数组
    mounted() {
        console.log(this.$refs.setItemRef)
},
2) Vue3
Vue3 中ref绑定的是一个函数,
<div v-for="item in 3" :ref="setItemRef"></div> //这里绑定的是函数
setup(){
        let itemRefs = []
            const setItemRef = el => {
                itemRefs.push(el)
            }
            onMounted(() => {
                console.log(itemRefs)
            })
}
二者获取ref的dom方式有变化,但是获取的结果相同
 编程教程 Vue3" loading="lazy">
3. 异步组件
在路由中,常常使用懒加载的方式来引入组件
1) Vue2
component: () => import('@/views/homePage/index.Vue'),
2)Vue3
在Vue3中引入了一个新的方法 --->defineAsyncComponent定义异步组件,来包裹Vue2引入方式里面的内容
import { defineAsyncComponent } from 'Vue'
component: defineAsyncComponent(() => import('./NextPage.Vue'))
4. 自定义指令
4.1 改变钩子函数的命名
1) Vue2
Vue2中绑定的钩子函数为
- bind - 指令绑定到元素后发生。只发生一次。
- inserted - 元素插入父 DOM 后发生。
- update - 当元素更新,但子元素尚未更新时,将调用此钩子。
- componentUpdated - 一旦组件和子级被更新,就会调用这个钩子。
- unbind - 一旦指令被移除,就会调用这个钩子。也只调用一次。
2) Vue3
将钩子函数的命名与生命周期的钩子函数命名相一致
- bind → beforeMount
- inserted → mounted
- beforeUpdate:新的!这是在元素本身更新之前调用的,很像组件生命周期钩子。
- componentUpdated → updated
- beforeUnmount:新的!与组件生命周期钩子类似,它将在卸载元素之前调用。
- unbind -> unmounted
4.2 在钩子函数中引用组件实例的方式
某些情况下需要去获取组件中实例的某些属性
1) Vue2
- 需要通过vnod来获取实例
Vue.directive('has', {
    inserted: (el, binding, vnode) => checkPermission(el, binding, vnode),
});

export const checkPermission = (el, binding, vnode) => {
    ...
    const permissionArr = vnode.context.$store.state.permissionId //所拥有的所有权限id
    ...
}
2) Vue3
- 从binding中去获取对象
export const checkPermission = (el, binding, vnode) => {
    ...
    const permissionArr =binding.instance.$store.state.permissionId //所拥有的所有权限id
    ...
}
5. 自定义元素元素的交互
5.1 is的用法
1) Vue2
- 组件:
<component :is="currentTabComponent"></component>
- html标签
<table>
    <tr is="blog-post-row"></tr>
</table>
2) Vue3
- 组件
<component is="currentTabComponent"></component>
- html标签
<table>
    <tr v-is="'blog-post-row'"></tr>  // v-is类似绑定一个变量,而我们需要组件名,为字符串,所以用单引号包裹
</table>
6. 事件
- Vue3中去除了 $on、$off、$once、三种方法,仅保留$emit。
7. 过滤器
Vue3中移除了过滤器的功能,建议使用methods或者computed 来代替,实际上在Vue2中也完全可以这两种方式实现
7.1 局部过滤器
1) Vue2
 <p>{{message|toLower}}</p>

    data() {
        return {
        message: 'ABC'
        }
    },
    filters: {
        toLower(value) {
            return value.toLowerCase()
        }
    }
2) Vue3
- Vue3用computed或者methods来定义
<p>{{messageToLower}}</p>

import {
    computed,
    ref,
} from 'Vue';

setup(){

    let message = ref('ABC')
    let messageToLower = computed(() => {
        // console.log(message)
        return message.value.toLowerCase()
    })
    return{
        messageToLower,
    }

}
7.2 全局过滤器
1) Vue2
Vue.filter('toLower',  (value)=> {
    return value.toLowerCase()
})
2) Vue3
- 在main.js中注册
const app =createApp(App)
app.config.globalProperties.$filter={
    toLower(value){
        return value.toLowerCase()
    }
}
- 使用
<p>{{$filters.toLower(message)}}</p>
8. 根节点
1) Vue2
- Vue2的 template中只能存在一个根节点
<template>
    <div id="app">
        ...
    </div>
</template>
2) Vue3
- Vue3中可以存在多个节点
<template>
    <div>...</div>
    <a>...</a>
    <p>...</p>
</template>
9. 内联模板
1) Vue2
-
利用inline-template属性
-
在Vue2中文档提示了这么一段话,所以几乎没有用过
不过,inline-template 会让模板的作用域变得更加难以理解。所以作为最佳实践,请在组件内优先选择 template 选项或 .Vue 文件里的一个 <template> 元素来定义模板。>
2) Vue3
移除了此功能,
10. 唯一的key
10.1 v-if中的key
1) Vue2
- 在Vue2中,v-if,v-else中的key是为了控制某个组件或者元素的复用
- 不带key的话会复用,< hello-world >组件只创建一次
<!---->
<template v-if="loginType === 'username'">
    <hello-world title="username"></hello-world>
</template>
<template v-else>
    <hello-world title="email"></hello-world>
</template>
<button @click="changeType">切换</button>
- 带key的话每次切换都会重新去渲染组件(前提是key不同)
<template v-if="loginType === 'username'">
    <hello-world title="username" key="a"></hello-world>
</template>
<template v-else>
    <hello-world title="email" key="b"></hello-world>
</template>
<button @click="changeType">切换</button>
2) Vue3
Vue3中默认是带有key的,这个key始终保持唯一,与其他的key不同,不能通过故意使用相同的 key 来强制重用分支。
<div v-if="condition">Yes</div>
<div v-else>No</div>
10.2 template 中 v-for 的key
1) Vue2
Vue2中,在template标签上,可以使用v-for指令,但是不能绑定key,只能在子节点上面去绑定唯一的key
<template v-for="item in list">
    <div :key="item.id">...</div>
</template>
2) Vue3
Vue3中可以将key绑定到template上
<template v-for="item in list" :key="item.id">
    <div>...</div>
</template>
刚开始学习 Vue,我们不推荐使用 vue-cli 命令行工具来创建项目,更简单的方式是直接在页面引入 vue.global.js 文件来测试学习。Vue3 中的应用是通过使用 createApp 函数来创建的,语法格式如下:const app = Vue.createApp({ /* 选项 */ })